Presented by Chad Fisher, Instructional Technology Coach, James Wood High School, Frederick County Public Schools
Have you ever heard of an AR Sandbox? This unique tool provides various opportunities for student learning without the need of special glasses or headsets. The construction of a sandbox also presents an interesting way to promote cross curricular work among various departments as well. Learn how one high school managed to make their own AR Sandbox through cooperation, collaboration, and creativity and how you can make one too.
Certificate of attendance form
Transcript
Hello, my name is Chad Fisher.
I'm an Instructional Technology Coach in Frederick County Virginia.
Today I'm gonna show you how we built our AR sandbox at our high school.
An augmented reality sandbox allows you to see a projected overlay on top of the sand in the sandbox and interact with the sand.
The sand creates different elevations that the computer picks up and translates into colors based on that elevation.
Wiggling your fingers over an area will make it rain by having virtual water flow downhill. You can see the shimmering in the lower sections depicting this.
The keyboard can be used with an assigned key to instantly flood the sand or another key can be used to dry out the sand. We found an inexpensive keypad on Amazon that would do the same thing so we could remove the keyboard. (https://amzn.to/2QG63ee)
Water that is projected will always flow to the lowest elevation.
Our first steps were to talk to the departments that would be able to assist in the creation of the AR sandbox. One of the first departments happened to be the agriculture department, so that way they could possibly help us actually construct the physical sandbox.
I talked to the administration to see if we could get some funds to afford some of the supplies and we talked to the IT department to make sure we could get the correct equipment.
The UC Davis website (https://arsandbox.ucdavis.edu/), or UC Davis themselves, are the ones that originally created the Augment Reality sandbox. Their website has all of the plans, the software, and the step-by-step instructions that you'll need.
The webpage itself has various bits of information on the menu at the top. You can see the installation hardware, software, there's a community, there's a forum, there are all kinds of information here and I highly recommend that you go to their website prior to considering the construction of an augmented reality sandbox. There various example videos on here and other resources so that way you can show those interested in your building what one looks like. The map displays other places that built their own sandboxes.
This website from Beale Science, or the YouTube video, shows a great demonstration of the sandbox in action and a little bit of how he created it.
Some supplies that you'll be needing in order to build your own augmented reality sandbox is the lumber in order to be able to construct the sandbox itself. We had ours donated fortunately from the Ag department who used this as another one of their projects. We needed the projector and actually tried two different ones. We finally settled on the one that was recommended by the UC Davis site (https://arsandbox.ucdavis.edu/). We needed a place in we had to have a computer Xbox 360 Kinect so that we could pick up the elevations. We used paint sealer to seal the sandbox so that way we could add water to stiffen up the sand. You’ll need a mid-level gaming graphics card, network access to be able to download and install the software, and a power strip. Then some optional supplies... We used a 3D printer and 3D modeling software. We wanted a separate keypad so we used a USB keypad found on Amazon, some plastic scoops to be able to play in the sand itself Those were optional.
This is a picture of the sandbox at an early stage as the Ag department was constructing it. You can see it has a pretty sturdy base with supports underneath. We have it on casters so that way it can be moved and rolled around if need be.
The projector will need mounts of some type that are adjustable. As you can see here, we put one on made for projectors.
The projector itself we need to make sure we got the right projector. At first, we got the incorrect kind. This is the one that was suggested from a couple of other resources that I found.
Here's a picture of someone from IT and one of our student workers trying to find the correct position for the projector. This turned out to be a little challenging because we didn't quite get the projector mounted in the one hundred percent correct spot.
I donated an old dell computer that I had sitting around so that way we could run the sandbox. We were able to just have it on its side.
I also had an Xbox 360 Kinect sitting around so I donated it for this as well. We just needed some adapters and some other cables which I got on Amazon.
It was very important we get the correct sand. You can just get any kind of play sand. It will work but we didn't want the silica floating around so we decided to purchase special sand.
This image shows everything after we got everything installed and when we were setting up some of the alignment settings you needed to do.
Then, of course, the sandbox running.
Now, some optional parts that we didn't need but we decided to add...
We used Tinker CAD in order to make some little design additions to the sandbox.
Again these were pretty much optional.
So the original mount for the Xbox 360 Kinect didn't quite work. The Kinect kept sliding around and kept moving. So it was taken off and I used zip ties to try to hold it in place. That ended up falling off so I went online and found a mount on thingiverse.com, adjusted it and 3D printed it. I screwed the mount into the frame that we had protecting the projector. It worked perfectly. We didn't have any issues with it at all. You can see in these pictures a closeup view of the mount.
The Kinect just slides in and out from the top of the mount.
Now the UC Davis website (https://arsandbox.ucdavis.edu/), in their directions, they do ask that you credit them in some way. So they have a couple options. But instead of just using those, I decided to make a little plaque that we would 3D print even with some fake screw holes. And uh, we glued this to the front of the AR sandbox so that way anyone walking up would be able to see that plaque.
Now, one of the latest additions was we had a keyboard as you saw, in the beginning, I mentioned in the video that you can press a button on a keyboard to make it rain. It almost floods the whole entire sandbox virtually or it can dry out the whole entire thing. We didn't like to have that keyboard just sitting around so we purchased the little remote keypad here off of Amazon (https://amzn.to/2QG63ee) and I designed a case to be able to hold it and mount it on to the back post of the sandbox. I just took some paint, it’s a little sloppy, but I took some paint and painted in the little recessed areas and painted the arrows.
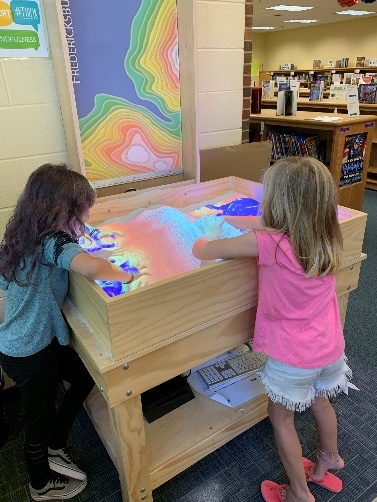
The sandbox itself we try to keep on as much as possible so that way students can kind of walk through to the library where we keep it and kind of play around in it, and you know, discover for themselves what can be done. It's amazing, this is a high school in the number of high school students that rush over to the sandbox and want to play in the sand.
Now we did have some troubleshooting. There were some issues that definitely came up while creating this. As I mentioned earlier, under the optional section, that was the original mount, we decided to get rid of that and create a new mount.
There was some troubleshooting getting everything aligned correctly because the projector was not centered as well as we wanted.
So we did have some next steps.
This is a short little video clip of something I was trying to experiment with, with a teacher. Because the water does flow downhill to the lowest elevation, I created a little damn out of some legos, pulled the spillway out, a little piece of lego, and all the water flowed down to the lower section. So there was a lesson that we were going to try to do where the kids could have little houses, they could learn about dams and how flooding occurs in various areas of the world.
There are other ways to depict the water, for instance, I need to find out how to make the water look like lava. Others have managed to do this with their sandboxes. If you look online, you'll be able to find videos of people that have actually created lava instead of water.
And this is the website again where I seriously advise you to go if you're interested in creating your own AR sandbox. (https://arsandbox.ucdavis.edu/)
Thank you, my name Chad Fisher I hope you enjoyed this presentation.