• Skip to main content

VSTE

Virginia Society for Technology in Education

  • About
    • About VSTE
    • Committees
      • Advocacy
      • Awards
      • Communication
      • Education
      • Elections
      • Equity & Diversity
      • Finance
      • Membership
      • Outreach
    • Get Involved
    • Leadership
    • Partners
  • Events
    • Annual Conference
    • Annual Conference Archives
    • Power of Coaching Conference
    • Live Events
    • Online Events
    • Corporate and Conference Sponsorship Opportunities
  • Blog
  • Subscribe/Join
  • Contact
  • Facebook
  • Twitter
  • LinkedIn
  • YouTube
  • Search

google

4 Google Sheets Formulas That Make You Feel Like a Super Hero and How to Use Them

January 17, 2022

Spreadsheets are some of my favorite things.  I know that was super nerdy, but what else would you expect from me?  As someone who likes organization, automation, and data calculations, I really enjoy the power I experience from using formulas that help me to do just that!  So, here are 4 of my favorite Google Sheets formulas that make me feel like a super hero!

=IMPORTRANGE

This formula is truly one of my favorites.  I use this formula a lot to pull data from one spreadsheet into a totally different spreadsheet.  Why would I want to use this, you ask?  Let me give you an example.  Suppose you have some amazing data in a massive multi-tab spreadsheet in Google Sheets.  But, rather than sharing the entire spreadsheet with someone, you want to only share the data in one particular tab.  You could always copy and paste that data into a new spreadsheet, but if the master data set is a work in progress, you will want some way to give that person constant access to the current set.  I present to you the Import Range formula!

Import Range takes the data range in that tab, sends it to your new spreadsheet, and constantly updates the data in the new spreadsheet as it changes in the master spreadsheet.  So, here’s the formula:

=importrange("SpreadsheetURL","’Tab Name’!Range of Data to Import")

In the example below, I’m importing data from this spreadsheet “docs.google.com/spreadsheet/12345” and I want to Import all data in the tab named “List1” that has data in Column A - Column E.

spreadsheet example 1
Click on any example to see the full size image.

In my new spreadsheet I’ll use this formula in the first cell of the sheet:
=importrange(“docs.google.com/spreadsheet/12345”, “List1!A:F”)spreadsheet example 1
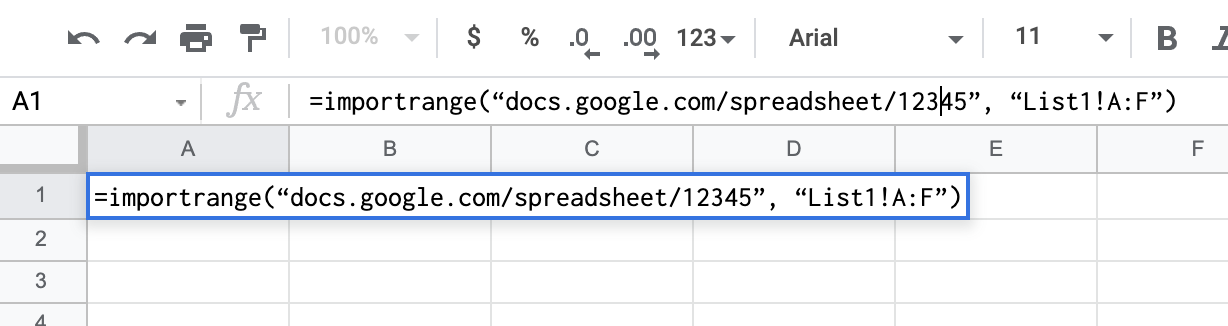
I have to then give permission to use the data in my master spreadsheet from a popup that appears in the cell.

spreadsheet example 3

Viola, I have imported my data set!
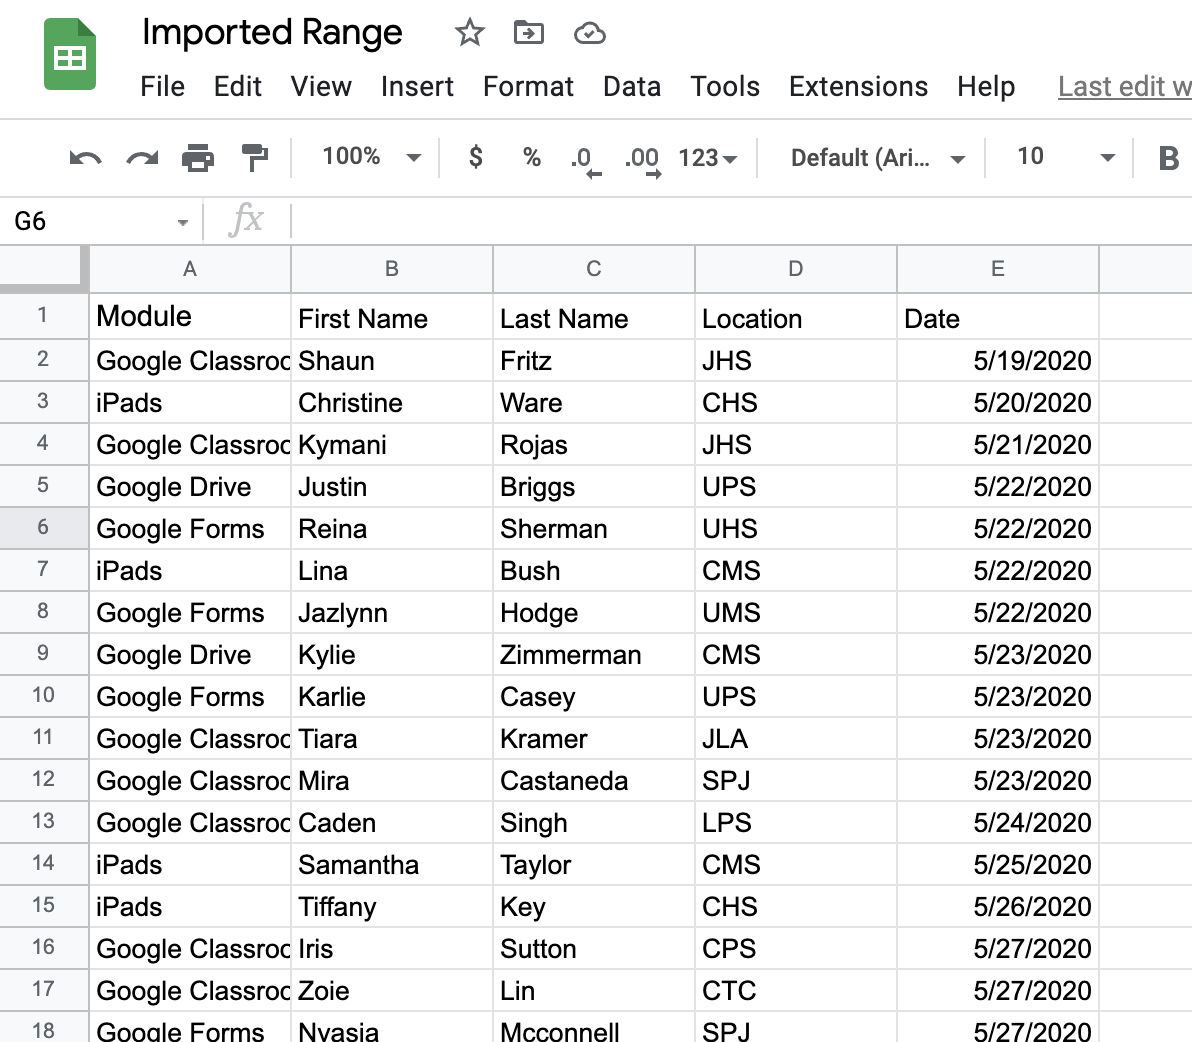
Spreadsheet example 4

=FILTER

Now, for that spreadsheet containing the data I have imported, let’s say I want to create a new tab that contains an automatically filtered listing of people who have completed a particular module.  I can use filter views, but that often means I have to keep turning filters on and off.  There has to be an easier way, and there is, it’s the FILTER formula!

=filter(‘Tab Name’!DataRange,’Tab Name’!FirstSearchLocation:Condition")

I have the sheet of data that I want to Filter by the Module each person completed. I created a new tab called “Google Classroom Only” where I will be working.

Spreadsheet example 5
I will use the following formula in the new tab.

=FILTER(Sheet1!A2:E,Sheet1!A2:A="Google Classroom")

(Note: I tell the formula to start at the first true entry to search, A2.  If you use A:E rather than A2:E, you will get an error message regarding range size mismatches.)spreadsheet example 6

I now have a filtered listing of only those who completed the Google Classroom Module.spreadsheet example 7

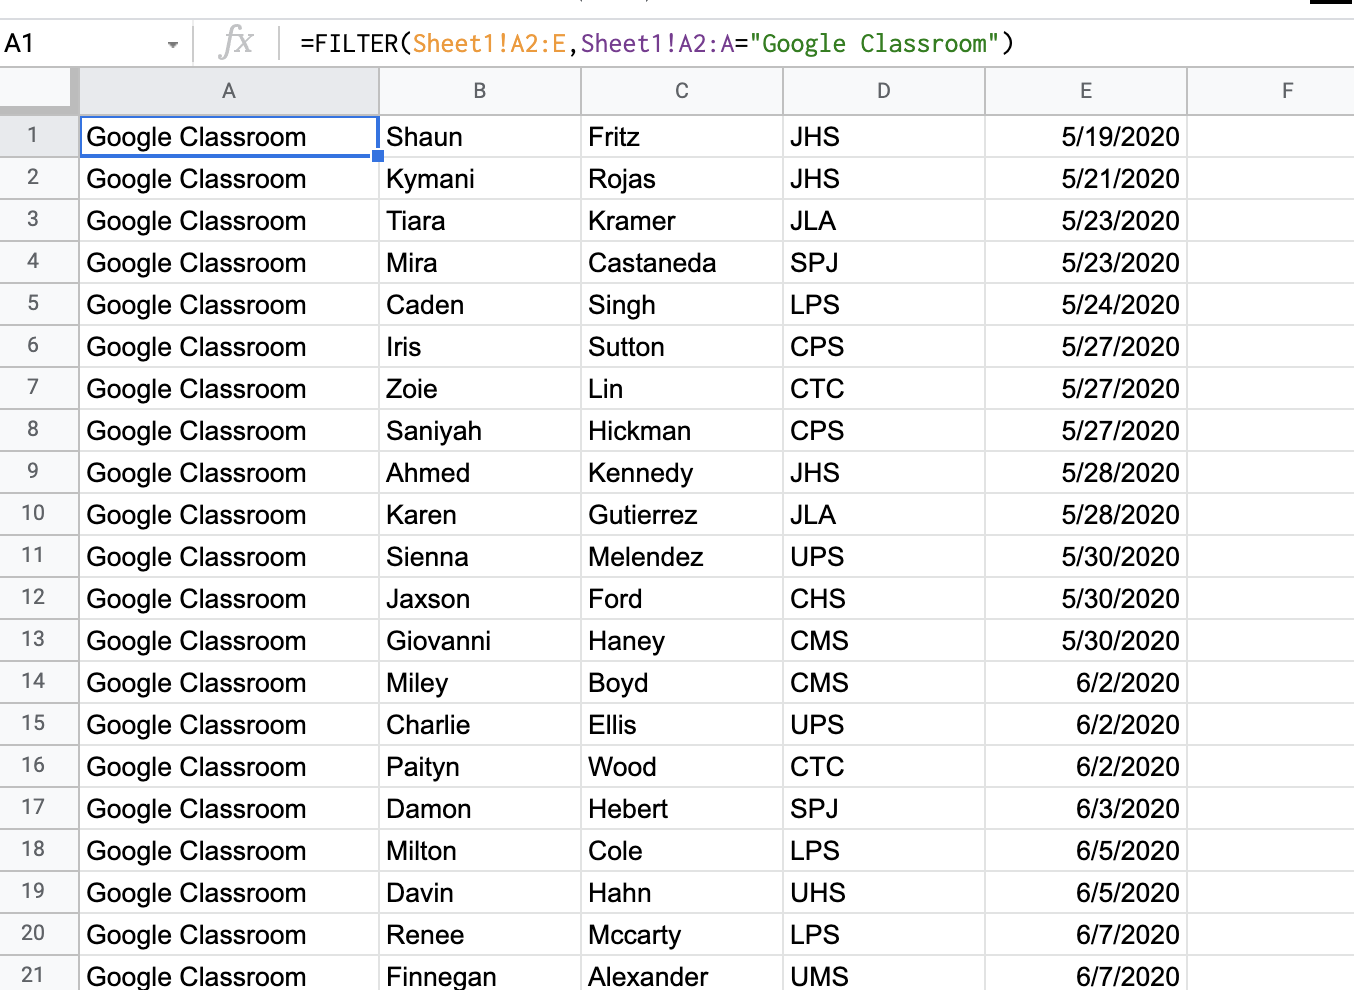
I can now use the same technique to make a new tab for each module to better organize the data.

=LEFT & =RIGHT

These awesome formulas allow you to truncate data after a certain number of characters starting either from the LEFT or the RIGHT side of the cell.    The formula looks like this:

=LEFT(Cell, Number of characters to keep)
=RIGHT(Cell, Number of characters to keep)

In my data set I’ve been using, let’s say I want only the first initial of everyone’s first name.spreadsheet example 8

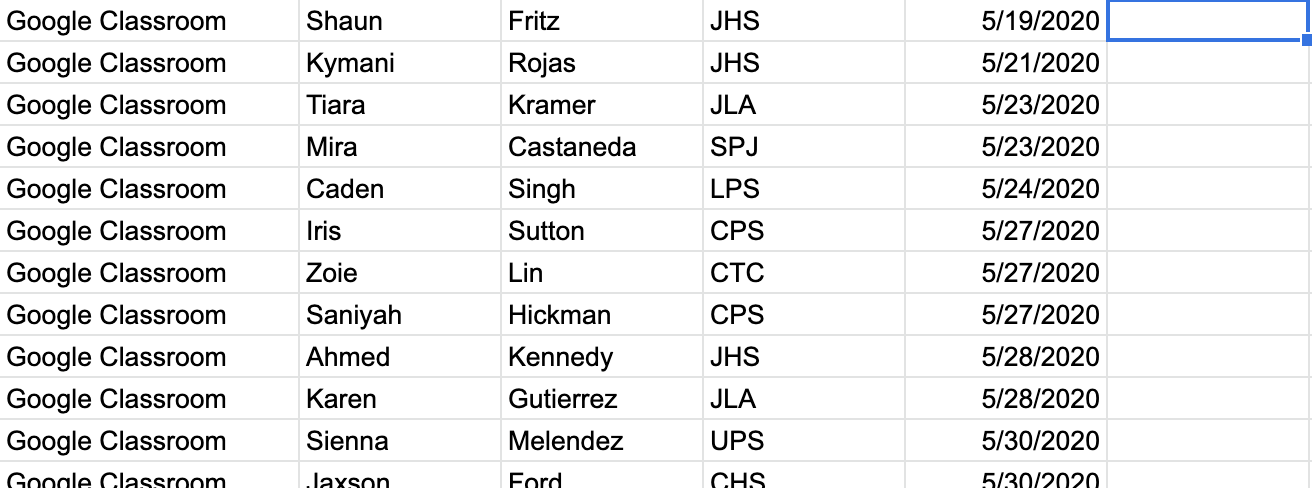
Since I’d be starting on the left, I’ll use the LEFT formula.  I’ll start with cell B1 and tell it to only keep one character:
=LEFT(B1, 1)spreadsheet example 9
Once I get the desired result, I copy and paste that formula down the column to have it match up with the associated rows.
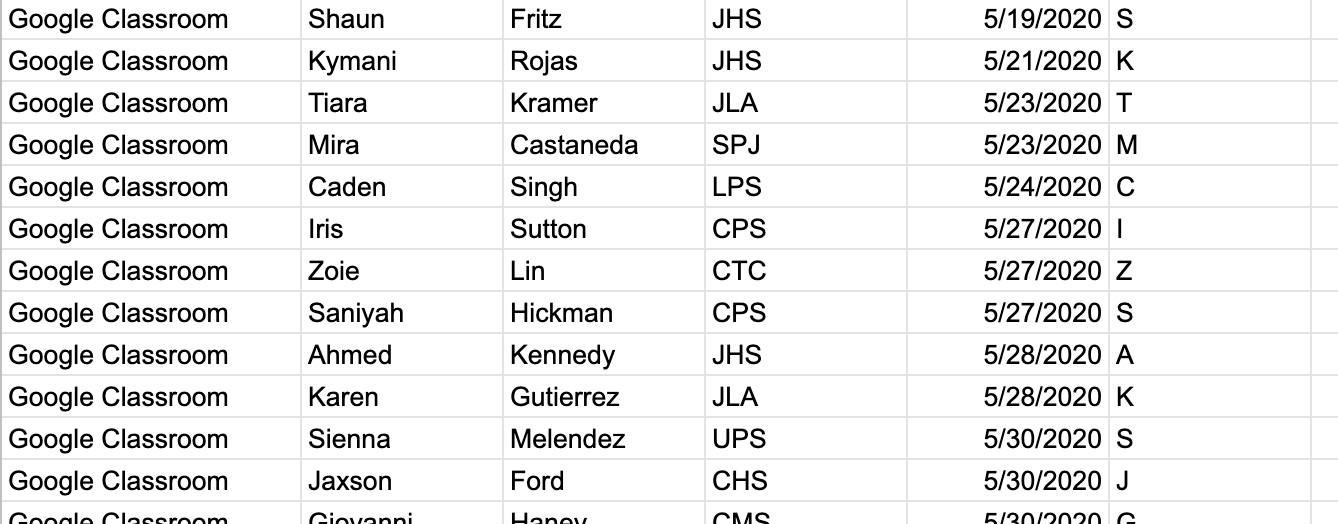
spreadsheet example 10

=LOWER & =UPPER

Sometimes I need to remove the capitalization of words or names, especially in cases of assumed usernames.  The Lower and Upper formulas allow me to do just that:

=LOWER(Cell)
=UPPER(Cell)

In my data set, I want a column of all of the first initials as lowercase letters and a column of all of the last names in lowercase.    To do this, I’ll use the Lower formula twice.

I’ll start in cell F1 since that’s where my initials begin.  I’ll use this formula in the Cell G1:

=LOWER(F1)spreadsheet example 11

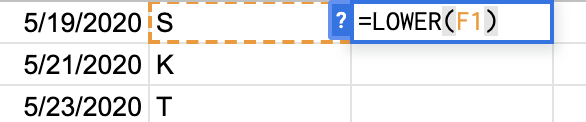
Now I can copy and paste both formulas down the columns to get my lowercase versions of the data.spreadsheet example 12

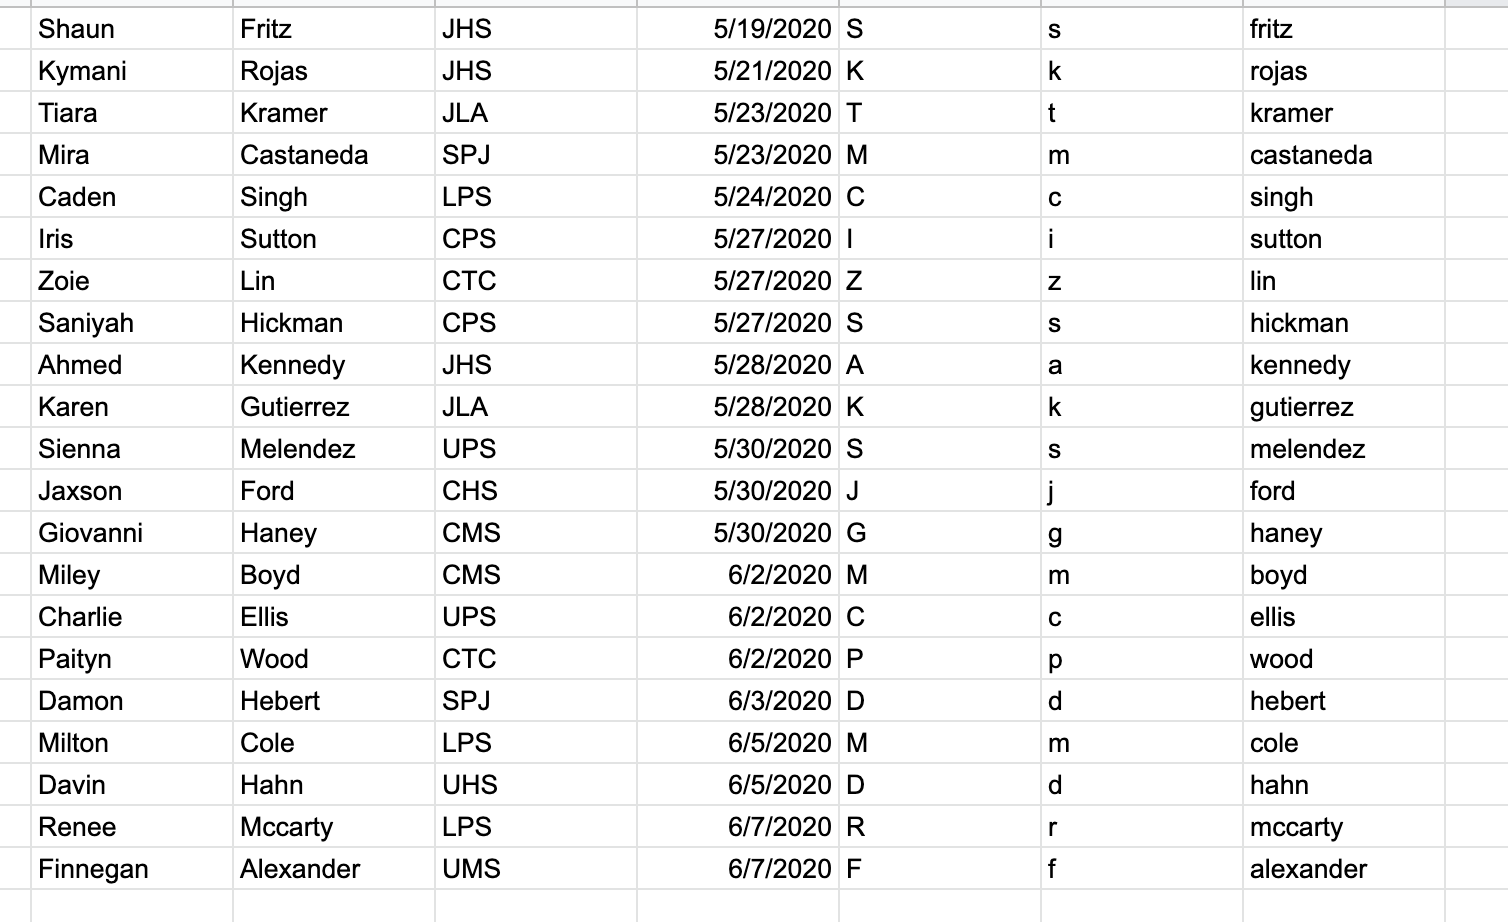
Spreadsheets are amazing and can make you feel extremely powerful when it comes to organizing your data.  You can check out some other awesome spreadsheet formulas for Google Sheets on the Google Sheets Function List.


Written by Daniel Vanover. Daniel is a Technology Coach for Wise County Public Schools and is a Google Certified Educator, Trainer, and Administrator. You can connect with him and get more information on his website.

Share this:

  • Tweet
  • Email

Organizational and Productivity Tools in Google Keep

October 27, 2021

Busy? Are you rushing from one thing to the next, drowning in meetings and paperwork and a little stressed? The workload is heavy, and COVID-19 and national issues compound our personal and work lives every day. And you just forgot something? I am at the age where I forget things and the memory isn’t what it used to be. Therefore, I need all the help I can get to ‘keep’ up. Fear not, there’s an app for that.

As an ITRT, I’ve explored many productivity tools, but a few years ago, I discovered Google Keep, and hands down, it is my all time favorite. I created a Google Keep promo to share my enthusiasm and tell my teachers about this often missed Google tool. Google Keep is a multi-featured note-taking tool, often missed in the Google Suite of applications. And yes, this virtual sticky notepad, of sorts, has been around since 2013, but continues to rank high among its competitors. The reviewers may say that Google Keep doesn’t have all the bells and whistles of Evernote and OneNote, but its ability to sync with Google on all your devices, unlimited notes, checklists and voice notes makes it a “keeper.”

screenshot from Google Keep

I use multiple accounts to manage me, school and community activities. With the Google Keep app on my phone, it’s always with me whether I’m walking through the yard, taking pictures or jotting down things I need to get done and don’t want to forget or in a meeting. There’s no need to look for a pen or scratch paper or try to remember you put a business card or flyer. Anytime I get off the phone with my pastor or supervisor, I’m writing a note or reminder while I’m on the phone about what I need to do or know. It’s easy to capture images, visual examples I want to remember and random thoughts into a note to color-code, label and share. I love the checklist. Putting those tasks in a checklist tells me what’s next and what’s already done. In addition to the amazing checklist, did I mention that it’s Free?!

At work, I can practice what I preach. As educators, we embed the 4C’s into classroom lessons. Google Keep also incorporates 21st century skills in the app. One can create and doodle with the drawings feature and share and collaborate on notes with colleagues and family. Sharing the groceries is brilliant!

At the onset of the pandemic, we kicked off our school year with a live and pre-recorded virtual training sessions. Among them, a short virtual PD to show teachers how to use Google Keep. This mini tutorial highlights features, how to get started using Google Keep and other tips, including a Edu in 90 segment about the some features only available on the phone app.

screenshot from Google Keep

It is so easy to make quick notes, in a variety of ways. Notes can be created by text, or a checklist, capturing pictures or drawing or making a voice recording.

Here are some of the features of Google Keep.

  1. Simple Note-taking. Jotting down notes can be done by text or dictating important information using the phone audio.
  2. Copying to Google Docs. One of the greatest benefits of Keep is its seamless integration with the entire Google Suite, such as Gmail, Google Drive, or Google Docs.
    Labels. Making labels (categories or folders) for your notes are added in the settings area.
  3. Pin and Color-Code. These two features help organize your notes. You can pin a current or important note to move it to the top of the list where it is more easily accessed. The color coding can be used to separate or identify similar topics.
  4. Set Reminders. Create a pop-up reminder in Keep, and it will show up across your Google account on a certain date/time or even when you reach a certain location. Your notification will appear in your browser or on your phone.
  5. Images and Drawings. Take pictures of business cards, straps of paper, signs or anything you want or need. Images can be stand-alone notes or merged with any note. If you want to draw a note, there are several tools included. The Draw tools include a pen, marker, highlighter, rubber tool and a cutting tool, which allows you to move, rotate and resize the selected content.
  6. Transcribe text from images. The desktop version of Google Keep can transcribe text from images. Click on an uploaded image, then click the three-dot menu and select Grab image text. All text in the image will then be converted into searchable and editable text. You can do the same with handwritten notes (good penmanship required).
  7. Collaborators. Your Google Keep notes can be shared directly with others by selecting a note and choosing the person icon. You will then be able to add a user's email address or their name from your contacts. This turns you both into collaborators, with equal permissions to makes changes. Edits will automatically be visible to all the people with whom it is shared.
  8. Voice Notes. With the Google Keep app, you can dictate a note into your device, and the recording will be transcribed into a searchable, editable note.

Unfortunately, Google will end support for the Google Keep Chrome app in February 2021, but no worries. The app is being moved to Google Keep on the Web and still accessible. I’m keeping it, but just in case you’re nervous about it, here are The 8 Best Alternatives to Google Keep.

No matter what you choose, choose to keep a balance and allow productivity tools to help manage your busy lives.


Written by Sylvia Hicks. Sylvia has been an ITRT for 18 years, working the past five years in Amelia County. The career switcher came to education 25 years ago, after a career in the publishing industry, and loves teaching and learning with technology.

Share this:

  • Tweet
  • Email

The Magic Beneath the Surface of EdTech

May 26, 2021

In many pursuits in life and learning there is are easy ways that cut corners and often harder but more rewarding avenues to get to your desired destination. The world of edtech is no different, especially with the incredible pace at which technology is evolving. I couldn’t more passionately recommend to not move away from a technology just because there is a new one and/or without fully exploring the tool. Many times the magic of edtech tools lies beneath the surface and is only discovered after users have had adequate time to explore, fail, learn, grow, discover, make connections, and collaborate. Simply because a technology isn’t the latest one released, doesn’t mean it isn’t the best or just as capable as another. Correspondingly, if you have given enough time for a tool to be explored completely, you do not know what was truly possible nor the effect it could have had on teaching, learning, or leading.

In the Land of G Suite

Just one area of prominent examples of the magic beneath the surface of edtech lies within G Suite. Nearly every one of the apps that make up G Suite have an incredible amount of uses that one would never discover if they only took the tool at its surface value. The power of the tools truly becomes apparent when you begin to peel back the outer layers. Two great examples are Google Chrome and Google Slides.

Google Chrome is at its surface, just an internet browser. Like Microsoft Edge, Safari, or Firefox it will connect you to the vast amount of information and resources the internet hold. It will allow you to bookmark pages and even autofill forms & passwords for you. However, the magic beneath the surface is infinitely more powerful!

The first example of this is the ability to quickly change between Chrome users. This allows one to switch between work and personal accounts in second, each complete with their own separate bookmarks, saved autofill information, Google Drive, and more! Kasey Bell of Shake Up Learning explains the greatness of this feature quite well.

The second example of a bit of Chrome magic is found in the power of extensions installed via the Chrome Web Store. This store holds many free extensions that truly save time and enhance a user’s experience with Chrome. Countless added features and benefits can be found by adding in carefully selected and managed extensions (they do take system resources so choose wisely and manage with something like Extensity). Check out these blog posts all about Chrome Extensions and the magic they add to Chrome (Post 1, Periodic Table of Extensions, For Struggling Students).

If you listen to the Google Teacher Tribe Podcast with hosts Kasey Bell and Matt Miller, you’ll know that Google Slides is the “Swiss army knife of G Suite” (Episodes). Without stretching the imagination too far, there are easily fifty uses for Google Slides that are not presentations. Some of these include social media templates, eBooks/storybooks, review games, animation, choose-your-own adventure stories, brainstorming, interactive notebooks, and even create an “app.” Trust me when I say this is barely checking into the magic beneath the surface of Google Slides… check these out for more: Control Alt Achieve, Ditch That Textbook, Shake Up Learning, Teacher Tech, & All The Things You Didn’t Know Google Slides Could Do!

The Deep End of G Suite Magic Beneath the Surface

Thinking the above just isn’t enough Google awesomeness? I agree! Check out these further resources to take an amazing look into the deep end of G Suite magic beneath the surface:

  • Google Experiments
  • Hidden Google Goodness
  • Hipster Google: Google Tools You've Probably Never Heard Of
  • Uncommon G Suite Uses & Tools
  • Stranger Google: Crazy Tools From the Upside Down!

Written by Patrick B. Hausammann. Patrick is an Instructional Technology Resource Teacher in Clarke County Public Schools, and was recipient of a VSTE Tech Coach of the Year award at the 2018 Conference in Virginia Beach

Patrick describes himself as a perpetual optimist and believer in the power of a #growthmindset to #failfoward. He is the founder of UnisonEDU, Co-Founder of #EdcampNSV, and a Google Certified Innovator, Trainer, Admin, & Educator 1 & 2.

He can be found online at his website and as @PHausEDU on Twitter.

Share this:

  • Tweet
  • Email

Using Google Earth to Enhance Curriculum

February 15, 2021

As Library Media Specialists (LMS), we are always looking for new tech tools to increase student engagement and help teachers enhance their curriculum. One of our favorite tools over the years was Google Tour Builder. Needless to say, we were quite disappointed to find out that Google Tour Builder was going to be phased out and replaced with something called Google Earth Projects. But, turns out, this new tool is amazing!

When school buildings closed during the second half of the 2019/2020 school year and continued to stay closed throughout most of the 2020/2021 school year, the need for tech tools to enhance virtual instruction was at an all time high. Teachers were struggling to learn how to do their jobs virtually while also keeping kids engaged. So, they looked to the LMS and ITS (Instructional Technology Specialist) for help navigating through these unprecedented times. Google Earth Projects was a perfect fit!

Google Earth Projects allows students to travel all over the world virtually, diving into an interactive map and exploring locations with 360° photos and street view, while giving them the ability to create their own tours and projects to share their learning with teachers and classmates. Teachers can create templates and share with their students to edit, or students can create projects from scratch.

screenshot of a Google Earth Project

Since Google Earth is part of the G Suite, all projects are saved automatically in students’ Google Drives and can be added to or edited as they move through grade levels. Google Earth Projects allows students to drop pins to show locations, add 360° photos for an immersive experience, and add multimedia like photos, videos, and text to pinned locations. Students can also make copies and share out, as well as add collaborators. This tool allows for cross-curricular learning, combining research and writing, as well as content. In addition, students even have the opportunity to present their tours, allowing for oral communication data to be collected.

As Library Media Specialists, we hope to turn what could be a simple lesson into an engaging and interactive experience where students can showcase their research skills, along with their ability to engage in the 5Cs, while exploring curricular objectives. For example, students can show their learning of specific Civil War or American Revolutionary War locations. Additionally, Native American tribes, VA regions, landforms, landmarks, continents, and oceans are just a few of the content areas that have been highlighted within these projects.
As the pandemic and travel restrictions continue, the use of Google Earth projects allows students the opportunity to tour countries around the globe.

Street View image of Egyptian pyramid

Is your class researching countries? With Google Earth projects, students don’t have to just read about it in books; they can take a virtual field trip to see it up close and personal. Teaching geometry? Show students 3D shapes in the real world (think pyramids in Egypt, Spaceship Earth at Disney’s Epcot, cylindrical towers in Germany).

Google Earth projects can even enhance a simple read aloud. Yes, students are able to visualize the events in a story, but it would be fun to follow a characters’ travels throughout.

While you may be used to Google Tour Builder, give Google Earth Projects a chance and you won’t be disappointed! The opportunities are endless and will take your students on a trip around the world all while staying put in the confines of their very own classroom chair.


Written by Erin Nye and Courtney Phillips. Erin is a Library Media Specialist at Kingston Elementary School and can be found on Twitter @enye001. Courtney is a Library Media Specialist at Strawbridge Elementary School, and tweets @MrsPhillipsLMS.

Share this:

  • Tweet
  • Email

Providing Quality Feedback with Hippo Video

December 30, 2020

Professor James Pennebaker from the University of Texas at Austin noted that in the history of learning research, the role of feedback has always been paramount: “When people are trying to learn new skills, they must get some information that tells them whether or not they are doing the right thing.” While feedback is widely accepted as essential for meaningful learning, it is often something that teachers struggle with the most. During the pandemic, as students and teachers have been thrust into uncharted territory with some or all learning online, feedback has become even more critical for student success. This has forced many instructors to get creative in the use of online tools to provide feedback in a number of ways. One such way, we can provide our students with timely and in depth feedback, is by utilizing a number of video tools such as Hippo Video that will help students grow in their knowledge and skills.

Why Feedback Matters?

While the term feedback is used to describe a wide range of comments in the classroom, feedback is elementally information about how we are doing in our efforts to reach a goal (Wiggins, 2012). Beyond value statements, advice, or simple evaluation, feedback is observable and always goal oriented. Supported by decades of education research, the idea that we can produce greater learning by teaching less and providing more feedback is recurring, (Bransford, Brown, & Cocking, 2000; Hattie, 2008; Marzano, Pickering, & Pollock, 2001). It is more than a grade, a checkmark, or advice, helpful feedback is goal-referenced; tangible; actionable; specific and personalized; timely; ongoing; and consistent (Wiggins, 2012).

In the traditional classroom, that feedback is an ongoing process of feedback loops between the teacher and the students as well as between students. In the online classroom, feedback can occur in online live sessions but for many instructors feedback is relegated to the comments inserted in a Google Doc. But is that the best or only way to provide effective and timely feedback? Not if you have a tech tool like Hippo Video.

What is Hippo Video?

Hippo Video is an easy video creation tool for teachers or students. It allows you to record a digital whiteboard explainer, lesson activity or lecture, interview through webcam or screen record an entire web browser, including audio to boost engagement rate and video for nonverbal cues. Hippo Video is browser based or you can utilize the Chrome extension to quickly launch it to use it with webpages or other applications. It offers a simple interface that allows you to login with your Google Account and record in just a few clicks. When you are done you can edit and export videos into multiple platforms or formats ranging from Youtube to Google Classroom to Google Drive or download them.

The Benefits of Feedback with Hippo Video?

So you have assigned an essay for your students. They turn it in through your LMS and you begin the long and often arduous process of providing comments and corrections. This can take hours and hours and I often find myself wanting to say more but feel pressured to give “timely” feedback. Then after I sent my written feedback, I still have students who do not understand or need more information to be able to improve their work. This is where using video feedback tools like Hippo Video really can help save time AND provide more detailed feedback for your students. With video feedback, you are able to provide detailed feedback in a way that is more economical for the learner and can be watched again and again to help them edit their work toward the specified goal.

Hippo Video is essentially a screencasting tool that allows you to record your screen, audio, and even video. In this application, I primarily use the screen recorder and audio to focus attention on the student’s work. Thinking back to Wiggin’s definition, helpful feedback is goal-referenced; tangible; actionable; specific and personalized; timely; ongoing; and consistent (2012). Using video feedback helps you to focus the students attention to their work and provide clear evidence of their learning and progress to their goal.

The video can be watched on any device and repeated if necessary making it tangible and very personalized to the student. Because you can quickly and easily produce unlimited quality videos, you can make this type of feedback timely, ongoing, and consistent as well. While, video feedback is a great way to utilize Hippo Video, you can use it to create a wide variety of videos for your students and they can even create their own videos to demonstrate their learning. Give it a try by installing from the Google Chrome Store.

References

Bransford, J. D., Brown, A. L., & Cocking, R. R. (Eds.). (2000). How people learn: Brain, mind, experience, and school. Washington, DC: National Academy Press.

Hattie, J. (2008). Visible learning: A synthesis of over 800 meta-analyses relating to achievement. New York: Routledge.

Marzano, R., Pickering, D., & Pollock, J. (2001). Classroom instruction that works: Research-based strategies for increasing student achievement. Alexandria, VA: ASCD.

Stenger, M. (2014). 5 Research-based tips for providing students with meaningful feedback. Edutopia, August 6, 2014. https://www.edutopia.org/blog/tips-providing-students-meaningful-feedback-marianne-stenger

Wiggins, G. (2012). Feedback for learning. Educational Leadership.Volume 70 Number 1 Alexandria, VA: ASCD, pgs 10-16.


Written by Heather B. Askea. Heather is an Instructional Technology Coordinator at The University of Virginia's College at Wise Center for Teaching Excellence. She is also a member of the VSTE Board of Directors.

Share this:

  • Tweet
  • Email
  • Go to page 1
  • Go to page 2
  • Go to page 3
  • Go to Next Page »
  • About
  • Events
  • Blog
  • Subscribe/Join
  • Contact
  • Facebook
  • Twitter
  • LinkedIn
  • YouTube
  • Search

Update Member Profile | Support

Copyright © 2023 Virginia Society for Technology in Education · Log in